Build a Caching Layer in Node.js With Redis
使用 Redis 在 Node.js 中构建缓存层
Your Node.js backend is slow? Speed it up by caching responses and start returning them immediately. This will also drastically increase the number of users who can simultaneously access your site. The problem is that the basic approach to caching in Node.js involves spreading read and write caching operations across the business logic. This leads to code duplication and makes your project more difficult to maintain. A better solution is a Node.js caching layer!
你的 Node.js 后端很慢?通过缓存响应来加快速度并立即开始返回它们。这也将大大增加可以同时访问您网站的用户数量。问题在于 Node.js 中缓存的基本方法涉及在业务逻辑中分散读取和写入缓存操作。这会导致代码重复并使您的项目更难以维护。更好的解决方案是 Node.js 缓存层!
By using Redis as a cache and encapsulating all caching logic in a middleware function, you have control over which routes to apply caching behavior to. This way you get the benefits of caching without any downside to your codebase.
通过使用 Redis 作为缓存并将所有缓存逻辑封装在中间件函数中,您可以控制将缓存行为应用到哪些路由。通过这种方式,您可以获得缓存的好处,而不会给您的代码库带来任何负面影响。
In this article, you will discover why you need this layer in your Node.js architecture and see how to implement it with Redis in a step-by-step tutorial.
在本文中,您将了解为什么在 Node.js 架构中需要此层,并在分步教程中了解如何使用 Redis 实现它。
Take the performance of your Express application to the next level!
将 Express 应用程序的性能提升到一个新的水平!
Benefits of Using Redis in Node.js for Caching
在 Node.js 中使用 Redis 进行缓存的好处
Redis is an open-source in-memory data repository that serves as a key-value database. It provides extreme performance because it stores data in memory instead of on disk like other database technologies. In the context of a backend application, Redis is an excellent choice for implementing a caching system. Its speed and efficiency are critical for caching the most requested endpoint responses to reduce the server response times.
Redis 是一个开源内存数据存储库,用作键值数据库。它提供了极高的性能,因为它将数据存储在内存中,而不是像其他数据库技术那样存储在磁盘上。在后端应用程序的上下文中,Redis 是实现缓存系统的绝佳选择。它的速度和效率对于缓存请求最多的端点响应以减少服务器响应时间至关重要。
Caching with Redis in Node.js involves writing the responses produced by the servers to the in-memory database. This is great for both an API backend and a Node.js application that serves HTML pages. In the latter case, the key could be <URL+parameters>while the corresponding value is the associated HTML page. Subsequent requests referring to that “key” will be able to access the corresponding HTML page directly from Redis, skipping the execution of the same business logic again and again. By using Redis as a cache, Node.js can offload repetitive database queries and CPU calculations, saving considerable time and resources. The result is a more responsive application as a whole.
在 Node.js 中使用 Redis 进行缓存涉及将服务器生成的响应写入内存数据库。这对于 API 后端和提供 HTML 页面的 Node.js 应用程序来说都非常有用。在后一种情况下,键可以是 <URL+parameters> ,而相应的值是关联的 HTML 页面。后续引用该“key”的请求将能够直接从Redis访问相应的HTML页面,从而一次又一次地跳过相同业务逻辑的执行。通过使用 Redis 作为缓存,Node.js 可以卸载重复的数据库查询和 CPU 计算,从而节省大量时间和资源。其结果是整个应用程序的响应速度更快。
What Is a Caching Layer in Node.js and Why It Should Be a Middleware
Node.js 中的缓存层是什么以及为什么它应该是一个中间件
In Node.js, a caching layer is the part of the backend application that contains the logic to implement response caching logic. This code must rely on a caching provider, such as Redis. Now, the problem is that Redis works in memory, and RAM is expensive.
在 Node.js 中,缓存层是后端应用程序的一部分,其中包含实现响应缓存逻辑的逻辑。此代码必须依赖于缓存提供程序,例如 Redis。现在的问题是Redis在内存中工作,而RAM很昂贵。
Caching all routes is not the best approach because it would quickly fill up the available RAM. The ideal scenario is that you could choose the routes to enable caching for. That can easily be achieved through a Node.js Redis caching middleware, which will encapsulate the logic necessary to:
缓存所有路由并不是最好的方法,因为它会很快填满可用的 RAM。理想的情况是您可以选择启用缓存的路由。这可以通过 Node.js Redis 缓存中间件轻松实现,该中间件将封装以下所需的逻辑:
- Write to Redis the response produced by the server for the selected route.
将服务器为所选路由生成的响应写入 Redis。 - Read it when a new request arrives for the same endpoint.
当同一端点的新请求到达时读取它。
Once defined, you could then apply this middleware only to the routes where it makes sense. Time to learn how to build such a layer in Express!
定义后,您就可以将此中间件仅应用于有意义的路由。是时候学习如何在 Express 中构建这样的层了!
How to Implement a Caching Middleware Using Redis in Node.js
如何在 Node.js 中使用 Redis 实现缓存中间件
In this step-by-step tutorial section, you will learn how to implement Redis-based middleware for caching requests in Express. Keep in mind that you can easily adapt the following implementation procedure to any other caching database system.
在本分步教程部分中,您将学习如何实现基于 Redis 的中间件以在 Express 中缓存请求。请记住,您可以轻松地将以下实施过程应用于任何其他缓存数据库系统。
Prerequisites 先决条件
To follow this guide, you need these two requirements:
要遵循本指南,您需要满足以下两个要求:
- Node.js 18+: If you have not Node.js installed on your machine, download the installer from the official site, launch it, and follow the wizard.
Node.js 18+:如果您的计算机上尚未安装 Node.js,请从官方网站下载安装程序,启动它,然后按照向导操作。 - Redis: Follow the installation guide for your operating system to set up a local Redis server on your computer. Alternatively, you can opt for a Redis provider in the cloud.
Redis:按照您的操作系统的安装指南在您的计算机上设置本地 Redis 服务器。或者,您可以选择云中的 Redis 提供商。
The following sub-chapters show only the main steps to integrate Redis into Node.js. To avoid getting lost, we recommend keeping the codebase of the final application at hand by cloning the GitHub repository that supports this article:
以下子章节仅展示将 Redis 集成到 Node.js 的主要步骤。为了避免迷失,我们建议通过克隆支持本文的 GitHub 存储库来保留最终应用程序的代码库:
git clone https://github.com/Tonel/nodejs-redis-demoYou are now ready to set up a Node.js Express application to add the caching layer to!
您现在已准备好设置 Node.js Express 应用程序以添加缓存层!
Set Up Your Express Project
设置您的 Express 项目
Create a folder for your Node.js application, enter it, and run the npm init command below to bootstrap a new npm project:
为 Node.js 应用程序创建一个文件夹,进入该文件夹,然后运行下面的 npm init 命令来引导一个新的 npm 项目:
npm init -yInitialize your project with a src folder. This will contain all your Express business logic.
使用 src 文件夹初始化您的项目。这将包含您所有的 Express 业务逻辑。
Next, add express and dotenv to your project’s dependencies:
接下来,将 express 和 dotenv 添加到项目的依赖项中:
npm install express dotenvdotenv allows you to store the Redis server URL in an env, instead of hardcoding it in the code. So, even though it is an optional dependency, it is highly recommended.
dotenv 允许您将 Redis 服务器 URL 存储在环境中,而不是将其硬编码在代码中。因此,尽管它是一个可选依赖项,但强烈推荐它。
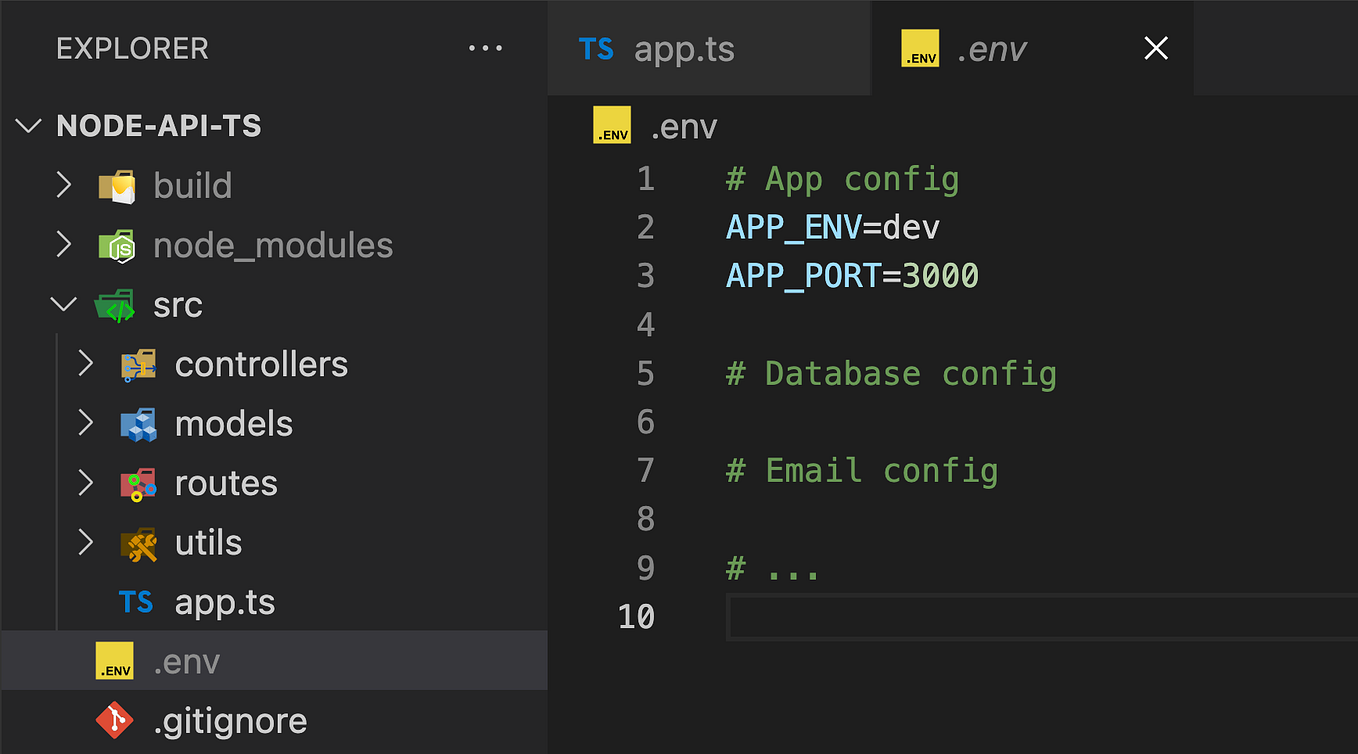
Add an empty .env file to your project’s root folder. You will need it later on.
将空的 .env 文件添加到项目的根文件夹中。稍后您将需要它。
Then, create the controllers folder inside src/ and add the following users.js file to it:
然后,在 src/ 内创建 controllers 文件夹并向其中添加以下 users.js 文件:
// ./src/controllers/users.jsconst UserController = {
getAll: async (req, res) => {
// simulate the time to retrieve the user list
await new Promise((resolve) => setTimeout(resolve, 250)); // the user list retrieved with a query or an API call
let users = [
{ id: 1, email: "john.doe@example.com", name: "John Doe" },
{ id: 2, email: "jane.smith@example.com", name: "Jane Smith" },
{ id: 3, email: "alice.jones@example.com", name: "Alice Jones" },
{ id: 4, email: "bob.miller@example.com", name: "Bob Miller" },
{ id: 5, email: "sara.white@example.com", name: "Sara White" },
{ id: 6, email: "mike.jenkins@example.com", name: "Mike Jenkins" },
{ id: 7, email: "emily.clark@example.com", name: "Emily Clark" },
{ id: 8, email: "david.ross@example.com", name: "David Ross" },
{ id: 9, email: "lisa.hall@example.com", name: "Lisa Hall" },
{ id: 10, email: "alex.garcia@example.com", name: "Alex Garcia" },
]; res.json({
users: users,
});
},
};module.exports = { UserController };
This defines an Express controller containing the business logic for a simple API endpoint that returns a list of users. Note the use of setTimeout() to simulate the delay introduced by a query or API call to retrieve the desired data. This will be useful to verify the performance improvement introduced by the Node.js Redis caching layer.
这定义了一个 Express 控制器,其中包含返回用户列表的简单 API 端点的业务逻辑。请注意,使用 setTimeout() 来模拟查询或 API 调用检索所需数据所引入的延迟。这对于验证 Node.js Redis 缓存层带来的性能改进非常有用。
Create an index.js file to start your Express server and register the above controller function to a route:
创建一个 index.js 文件来启动 Express 服务器并将上述控制器函数注册到路由:
// ./index.jsconst express = require("express");
// populate proces.env
require("dotenv").config();
const { UserController } = require("./src/controllers/users");// initialize an Express application
const app = express();
app.use(express.json());// register an endpoint
app.get("/api/v1/users", UserController.getAll);// start the server
const port = 3000;
app.listen(port, () => {
console.log(`Server is running on http://localhost:${port}`);
});
This is what your project’s directory will contain so far:
这是您的项目目录到目前为止将包含的内容:
├── node_modules/
├── src/
│    └── controllers/
│        └── users.js
├── .env
├── index.js
├── package-lock.json
├── package.json
└── README.md
In package.json, add the npm script below in the scripts object to make it easier to run your application:
在 package.json 中,在 scripts 对象中添加下面的 npm 脚本,以便更轻松地运行应用程序:
"start": "node index.js"You can now launch your backend locally with:
您现在可以使用以下命令在本地启动后端:
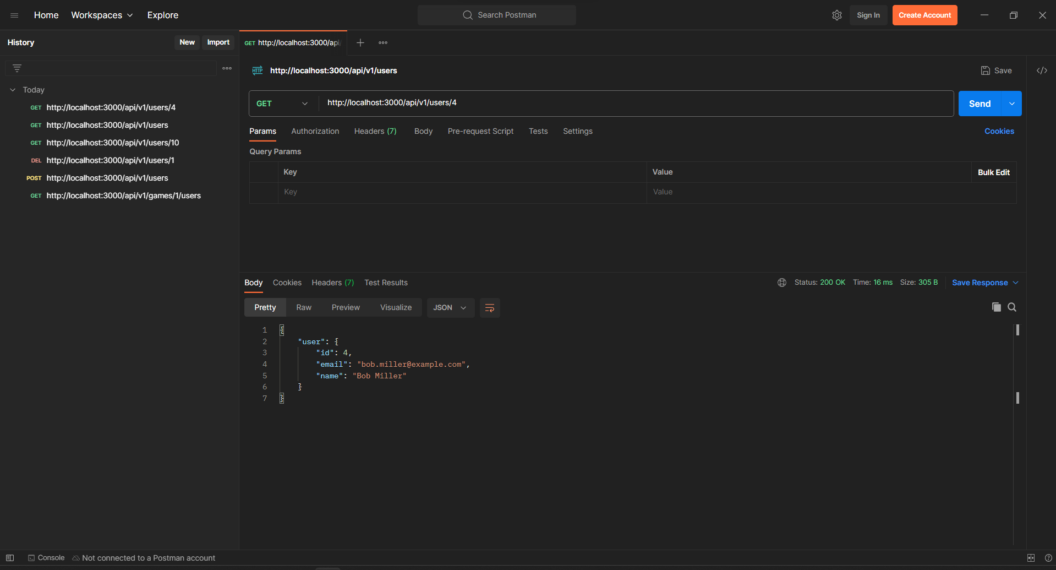
npm run startThe Node.js server backend will now be running at http://localhost:3000. Verify that it works by making a GET request to the http://localhost:3000/api/v1/users endpoint in your favorite HTTP client. That should return a list of users as below:
Node.js 服务器后端现在将在 http://localhost:3000 运行。通过向您喜爱的 HTTP 客户端中的 http://localhost:3000/api/v1/users 端点发出 GET 请求来验证它是否有效。这应该返回用户列表,如下所示:
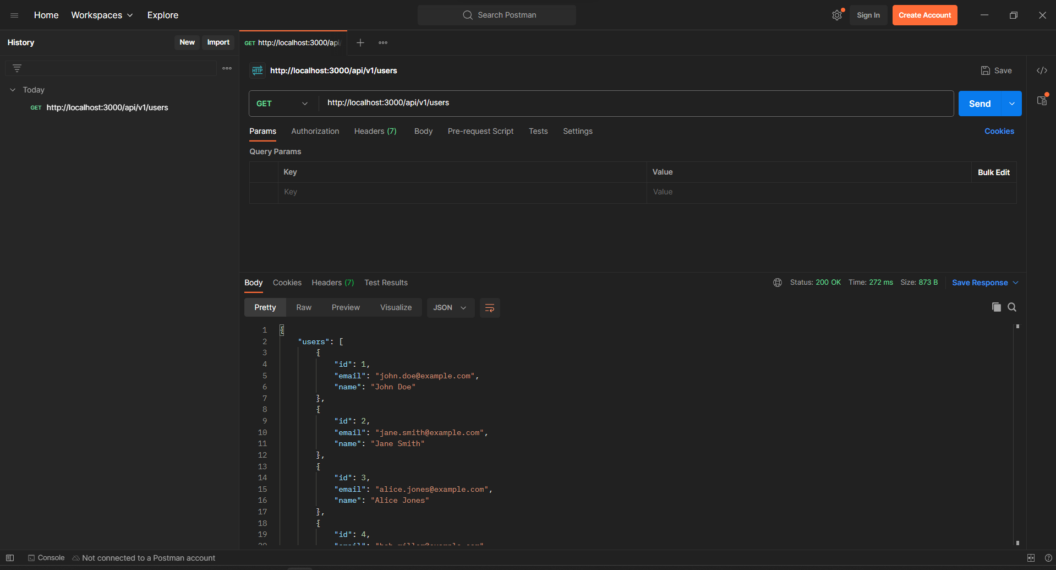
Note that the API took 272 ms. Bear that number in mind as it is about to decrease dramatically!
请注意,API 花费了 272 毫秒。请记住这个数字,因为它即将大幅减少!
Great, prepare your Node.js architecture to host a Redis caching layer.
太棒了,准备好 Node.js 架构来托管 Redis 缓存层。
Add the Caching Layer to Your Architecture
将缓存层添加到您的架构中
To build a Node.js Redis caching system for your routes, you need to define a custom middleware. Thus, create the middlewaresfolder inside src/ and add an empty redis.js file to it. This file will contain the logic for:
要为您的路由构建 Node.js Redis 缓存系统,您需要定义一个自定义中间件。因此,在 src/ 内创建 middlewares 文件夹并向其中添加一个空的 redis.js 文件。该文件将包含以下逻辑:
- Connecting to the Redis server.
连接到 Redis 服务器。 - Transforming an API call into a proper Redis key.
将 API 调用转换为正确的 Redis 密钥。 - Writing the response data for a request to the Redis database.
将请求的响应数据写入 Redis 数据库。 - Reading the response data for a request from the Redis database, if present.
从 Redis 数据库读取请求的响应数据(如果存在)。
In other words, that single file will centralize and encapsulate the entire caching logic of your backend application.
换句话说,该单个文件将集中并封装后端应用程序的整个缓存逻辑。
Your project’s folder will now contain:
您的项目的文件夹现在将包含:
├── node_modules/
├── src/
│    ├── controllers/
│    │    └── users.js
│    ├── middlewares/
│    │    └── redis.js
│    └── index.js
├── .env
├── package-lock.json
├── package.json
└── README.md
Amazing! Time to populate the redis.js file with the required lines of code.
惊人的!是时候用所需的代码行填充 redis.js 文件了。
Get Started With Redis Redis 入门
The best way to deal with Redis in Node.js is through the redis npm package. Install it with the following command:
在 Node.js 中处理 Redis 的最佳方法是通过 redis npm 包。使用以下命令安装它:
npm install redisThis package enables you to define a client object that exposes all the methods you need to read and write data to Redis. Since all functions in redis.js will rely on that object, store it in a global variable:
该包使您能够定义一个客户端对象,该对象公开向 Redis 读取和写入数据所需的所有方法。由于 redis.js 中的所有函数都将依赖于该对象,因此将其存储在全局变量中:
let redisClient = undefined;Use the createClient() function to initialize redisClient and then call the connect() method to connect to the Redis server:
使用 createClient() 函数初始化 redisClient ,然后调用 connect() 方法连接Redis服务器:
async function initializeRedisClient() {
  // read the Redis connection URL from the envs
  let redisURL = process.env.REDIS_URI
  if (redisURL) {
    // create the Redis client object
    redisClient = createClient({ url: redisURL }).on("error", (e) => {
      console.error(`Failed to create the Redis client with error:`);
      console.error(e);
    });
try {
// connect to the Redis server
await redisClient.connect();
console.log(`Connected to Redis successfully!`);
} catch (e) {
console.error(`Connection to Redis failed with error:`);
console.error(e);
}
}
}Encapsulate the Redis connection logic in a function, as you will have to call it in the index.js file.
将 Redis 连接逻辑封装在函数中,因为您必须在 index.js 文件中调用它。
Do not forget to import createClient from the redis package:
不要忘记从 redis 包中导入 createClient :
const { createClient } = require("redis");Note that the createClient() function accepts the URL to your Redis server. To avoid hardcoding it in the code, store in the REDIS_URI environment variable in the .env file as follows:
请注意, createClient() 函数接受 Redis 服务器的 URL。为了避免在代码中对其进行硬编码,请将其存储在 .env 文件中的 REDIS_URI 环境变量中,如下所示:
REDIS_URI="redis://localhost:6379"If you omit this declaration, initializeRedisClient() will not do anything due to the top level if instruction. Therefore, storing the Redis connection URL in an env is also an effective approach to gain the ability to disable caching programmatically without having to touch the code.
如果省略此声明,由于顶级 if 指令, initializeRedisClient() 将不会执行任何操作。因此,将 Redis 连接 URL 存储在环境中也是一种有效的方法,可以以编程方式禁用缓存,而无需接触代码。
From now on, we will assume that Redis is running locally on port 6379 — the default Redis port. If you are wondering how to specify authentication and database information in the URL, here is what the format of the Redis connection string looks like:
从现在开始,我们假设 Redis 在端口 6379 上本地运行 - 默认 Redis 端口。如果您想知道如何在 URL 中指定身份验证和数据库信息,Redis 连接字符串的格式如下:
redis\[s]://[[username\][:password]@]\[host\][:port][/db-number]Since initializeRedisClient() is an async function, you cannot simply call it in index.js. Instead, you need to wrap the Express initialization logic in an async function and add the initializeRedisClient() inside it as below:
由于 initializeRedisClient() 是一个 async 函数,因此您不能简单地在 index.js 中调用它。相反,您需要将 Express 初始化逻辑包装在 async 函数中,并在其中添加 initializeRedisClient() ,如下所示:
// index.jsconst express = require("express");
// populate proces.env
require("dotenv").config();
const { UserController } = require("./src/controllers/users");
const { initializeRedisClient } = require("./src/middlewares/redis");async function initializeExpressServer() {
// initialize an Express application
const app = express();
app.use(express.json()); // connect to Redis
await initializeRedisClient(); // register an endpoint
app.get("/api/v1/users", UserController.getAll); // start the server
const port = 3000;
app.listen(port, () => {
console.log(`Server is running on http://localhost:${port}`);
});
}initializeExpressServer()
.then()
.catch((e) => console.error(e));
Try running the Express application again. If you followed the steps correctly, you will see these messages in the terminal:
尝试再次运行 Express 应用程序。如果您正确执行了这些步骤,您将在终端中看到以下消息:
Connected to Redis successfully!
Server is running on http://localhost:3000
You Express application now connects to Redis as expected!
You Express 应用程序现在按预期连接到 Redis!
Define the Redis Key Generation Logic
定义Redis密钥生成逻辑
When the Node.js server receives a request for an exposed endpoint, Express intercepts it and translates it into the req object. Thus, a request is nothing more than a JavaScript object at the application level.
当 Node.js 服务器收到对公开端点的请求时,Express 会拦截该请求并将其转换为 req 对象。因此,请求只不过是应用程序级别的 JavaScript 对象。
To produce a Redis key associated with the incoming request, you might think of serializing the req object into a JSON string and then hashing it with a built-in method. The problem is that this simple solution is not very effective. Why? Because you want the key to be the same even if the order of the query parameters or fields in the body is different.
要生成与传入请求关联的 Redis 键,您可能会考虑将 req 对象序列化为 JSON 字符串,然后使用内置方法对其进行哈希处理。问题是这个简单的解决方案并不是很有效。为什么?因为即使正文中的查询参数或字段的顺序不同,您也希望键相同。
If you follow that approach, /api/v1/users?offset=10&page=1 and /api/v1/users?page=1&offeset=1 will produce two different keys. However, those are exactly the same API call. This Redis key generation strategy leads to overfilling the Redis database storage, limiting the server’s caching capabilities as a result!
如果您遵循这种方法, /api/v1/users?offset=10&page=1 和 /api/v1/users?page=1&offeset=1 将生成两个不同的键。然而,这些是完全相同的 API 调用。这种 Redis 密钥生成策略会导致 Redis 数据库存储空间过满,从而限制服务器的缓存能力!
A more effective solution is to rely on object-hash, a popular npm package for generating order-insensitive, consistent, and reliable hashes. Add it to the project dependencies with:
更有效的解决方案是依赖 object-hash ,这是一个流行的 npm 包,用于生成顺序不敏感、一致且可靠的哈希值。将其添加到项目依赖项中:
npm install object-hashThen, import it in your redis.js middleware file:
然后,将其导入到您的 redis.js 中间件文件中:
const hash = require("object-hash");Now, instead of hashing the req object directly, you should define a custom object with only the data you want to involve in the hashing operation. This is a tip to have more control over the hashing process. Another tip is to avoid using the hash directly as the Redis key. The reason is that if you explore the data stored in the Redis database, you want to understand which API endpoint the <key, value> record refers to. Therefore, you should add the req.path before the hash as below:
现在,您不应直接对 req 对象进行哈希处理,而是应该定义一个仅包含您想要参与哈希操作的数据的自定义对象。这是对哈希过程进行更多控制的技巧。另一个技巧是避免直接使用哈希作为 Redis 键。原因是,如果您探索 Redis 数据库中存储的数据,您希望了解 <key, value> 记录引用了哪个 API 端点。因此,您应该在哈希值之前添加 req.path ,如下所示:
function requestToKey(req) {
  // build a custom object to use as part of the Redis key
  const reqDataToHash = {
    query: req.query,
    body: req.body,
  };
// `${req.path}@...` to make it easier to find
// keys on a Redis client
return `${req.path}@${hash.sha1(reqDataToHash)}`;
}Given the http://localhost:3000/api/v1/users GET call, requestToKey() will return something like:
给定 http://localhost:3000/api/v1/users GET 调用, requestToKey() 将返回类似以下内容的内容:
"/api/v1/users@c0004b1d98e598127f787c287aaf7c0db94454f1"Fantastic! It only remains to define the reading and writing logic.
极好的!只需要定义读写逻辑即可。
Implement the Caching Middleware
实施缓存中间件
The prerequisite for both write and read operations in Redis is that there is an active connection to a Redis server. Add a utility function to redis.js to verify that:
Redis 中写入和读取操作的前提条件是与 Redis 服务器存在活动连接。向 redis.js 添加一个实用函数来验证:
function isRedisWorking() {
  // verify wheter there is an active connection
  // to a Redis server or not
  return !!redisClient?.isOpen;
}
Thanks to the isOpen field, you can verify whether the Redis client’s underlying socket is open or not.
通过 isOpen 字段,您可以验证 Redis 客户端的底层套接字是否打开。
The next step in implementing a Node.js Redis caching system is to define a function to write data to the Redis database and a function to read data from it.
实现 Node.js Redis 缓存系统的下一步是定义一个将数据写入 Redis 数据库的函数和一个从中读取数据的函数。
This is what the write function looks like:
write 函数如下所示:
async function writeData(key, data, options) {
  if (isRedisWorking()) {
    try {
      // write data to the Redis cache
      await redisClient.set(key, data, options);
    } catch (e) {
      console.error(`Failed to cache data for key=${key}`, e);
    }
  }
}
That accepts a key, its value, and some options and passes them to the set() method of the redisClient object to store data in Redis. options is an object that involves the following fields:
它接受一个键、它的值和一些选项,并将它们传递给 redisClient 对象的 set() 方法以将数据存储在 Redis 中。 options 是一个对象,涉及以下字段:
{
    EX, // the specified expire time in seconds
    PX, // the specified expire time in milliseconds
    EXAT, // the specified Unix time at which the key will expire, in seconds
    PXAT, // the specified Unix time at which the key will expire, in milliseconds
    NX, // write the data only if the key does not already exist
    XX, // write the data only if the key already exists
    KEEPTTL, // retain the TTL associated with the key
    GET, // return the old string stored at key, or "undefined" if key did not exist
}
These correspond to the options supported by the SET command in Redis. Find out more in the documentation.
这些对应于 Redis 中 SET 命令支持的选项。在文档中了解更多信息。
Similarly, you can implement the read function this way:
同样,你可以这样实现 read 函数:
async function readData(key) {
  let cachedValue = undefined;
if (isRedisWorking()) {
// try to get the cached response from redis
cachedValue = await redisClient.get(key);
if (cachedValue) {
return cachedValue;
}
}
}In this case, you can use the get() method of redisClient to read the value associated to the specified key from the Redis database.
在这种情况下,您可以使用 redisClient 的 get() 方法从Redis数据库中读取与指定键关联的值。
Note that requestToKey(req) was not used in either of these functions. That is because the write and read function should remain as generic as possible. Now, use them to implement the Redis caching middleware function:
请注意,这些函数中均未使用 requestToKey(req) 。这是因为写入和读取功能应尽可能保持通用。现在,使用它们来实现Redis缓存中间件功能:
function redisCacheMiddleware(
  options = {
    EX: 21600, // 6h
  }
) {
  return async (req, res, next) => {
    if (isRedisWorking()) {
      const key = requestToKey(req);
      // if there is some cached data, retrieve it and return it
      const cachedValue = await readData(key);
      if (cachedValue) {
        try {
          // if it is JSON data, then return it
          return res.json(JSON.parse(cachedValue));
        } catch {
          // if it is not JSON data, then return it
          return res.send(cachedValue);
        }
      } else {
        // override how res.send behaves
        // to introduce the caching logic
        const oldSend = res.send;
        res.send = function (data) {
          // set the function back to avoid the 'double-send' effect
          res.send = oldSend;
// cache the response only if it is successful
if (res.statusCode.toString().startsWith("2")) {
writeData(key, data, options).then();
} return res.send(data);
}; // continue to the controller function
next();
}
} else {
// proceed with no caching
next();
}
};
}
A lot is going on in the above snippet, so let’s break it down step by step.
上面的代码片段发生了很多事情,所以让我们一步一步地分解它。
First, notice that the redisCacheMiddleware() is not an Express middleware function. Instead, it returns an Express middleware function. That is the recommended way to define a middleware with custom optional arguments. Change the default optionsobject according to your needs.
首先,请注意 redisCacheMiddleware() 不是 Express 中间件函数。相反,它返回一个 Express 中间件函数。这是使用自定义可选参数定义中间件的推荐方法。根据您的需要更改默认的 options 对象。
Next, redisCacheMiddleware() generates the Redis key for the incoming request and uses it to read data from Redis. If there is an associated value, it returns it immediately, without proceeding to the controller function. If JSON.parse() raises an exception, it produces the response with the generic res.send() instead of the specific res.json(). In this way, the caching logic works with both JSON and non-JSON data.
接下来, redisCacheMiddleware() 为传入请求生成 Redis 密钥,并使用它从 Redis 读取数据。如果存在关联值,它将立即返回该值,而不继续执行控制器函数。如果 JSON.parse() 引发异常,它会使用通用 res.send() 而不是特定的 res.json() 生成响应。这样,缓存逻辑就可以处理 JSON 和非 JSON 数据。
Otherwise, the function overwrites the res.send() method to call writeData() on succesfull responses. That way, whenever an API with this middleware returns a 2XX response, the response data is stored on Redis. Since res.json() calls res.send()under the hood, you do not have to also overwrite res.json(). Then, it continues to the controller function. When this calls res.json() or res.send() the custom response function with caching logic will be called instead. Thus, the produced data will be written to Redis and then returned by the server.
否则,该函数将覆盖 res.send() 方法以在成功响应时调用 writeData() 。这样,每当带有此中间件的 API 返回 2XX 响应时,响应数据就会存储在 Redis 上。由于 res.json() 在底层调用 res.send() ,因此您不必覆盖 res.json() 。然后,它继续执行控制器功能。当调用 res.json() 或 res.send() 时,将调用具有缓存逻辑的自定义响应函数。这样,产生的数据就会写入Redis,然后由服务器返回。
Wonderful! The next step is to use Redis middleware on an endpoint.
精彩的!下一步是在端点上使用 Redis 中间件。
Register the Middleware to the Routes You Want to Cache
将中间件注册到您要缓存的路由
Import the redisCachingMiddleware middleware function in index.js and use it in the route definition as follows:
在 index.js 中导入 redisCachingMiddleware 中间件函数,并在路由定义中使用它,如下所示:
app.get("/api/v1/users", redisCachingMiddleware(), UserController.getAll);Note the () after redisCachingMiddleware. That is required as redisCachingMiddleware is not a middleware function itself, but it returns a middleware function. So, you need to call the function to get the desired result.
请注意 redisCachingMiddleware 之后的 () 。这是必需的,因为 redisCachingMiddleware 本身不是中间件函数,但它返回一个中间件函数。因此,您需要调用该函数以获得所需的结果。
If you want to specify custom options for a single route, you could do it this way:
如果你想为单个路由指定自定义选项,你可以这样做:
app.get(
  "/api/v1/users",
  redisCachingMiddleware({
    options: {
      EX: 43200, // 12h
      NX: false, // write the data even if the key already exists
    },
  }),
  UserController.getAll
);
Well done! You just implemented a Node.js Redis caching layer!
做得好!您刚刚实现了 Node.js Redis 缓存层!
Put It All Together 把它们放在一起
If you follow all steps above carefully, your Express project will now contain the same code as the repository that supports this guide. To test the caching system, start the Redis server locally and the demo application you retrieved from GitHub in the “Prerequisites” section. Enter the project folder, install the project’s dependencies, and execute the start npm script:
如果您仔细遵循上述所有步骤,您的 Express 项目现在将包含与支持本指南的存储库相同的代码。要测试缓存系统,请在本地启动 Redis 服务器以及您在“先决条件”部分中从 GitHub 检索到的演示应用程序。进入项目文件夹,安装项目依赖,执行 start npm脚本:
cd "nodejs-routing-demo"
npm install
npm run start
The demo server should now be listening on port 3000.
演示服务器现在应该正在侦听端口 3000 。
Make a GET HTTP request to http://localhost:3000/api/v1/users. This will now trigger the caching logic and the API response will be stored in the Redis database. Verify that with a Redis client:
向 http://localhost:3000/api/v1/users 发出 GET HTTP 请求。现在这将触发缓存逻辑,API 响应将存储在 Redis 数据库中。使用 Redis 客户端验证:
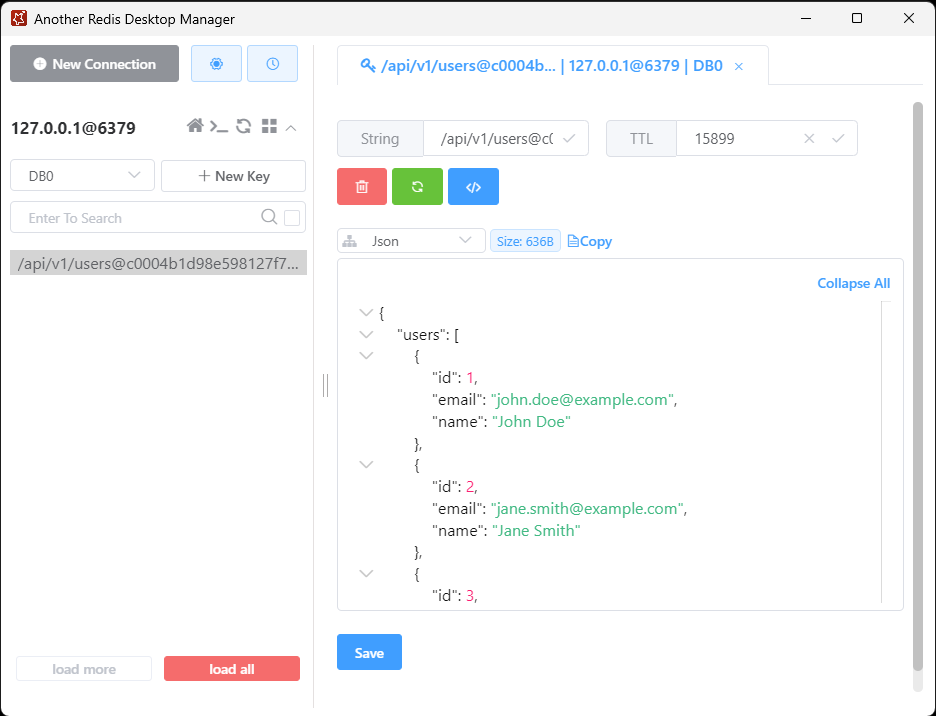
The value associated with the selected key contains the same data returned by the API.
与所选键关联的值包含 API 返回的相同数据。
Call the same endpoint a second time, and note how fast the server will produce a response:
第二次调用同一端点,并注意服务器产生响应的速度:
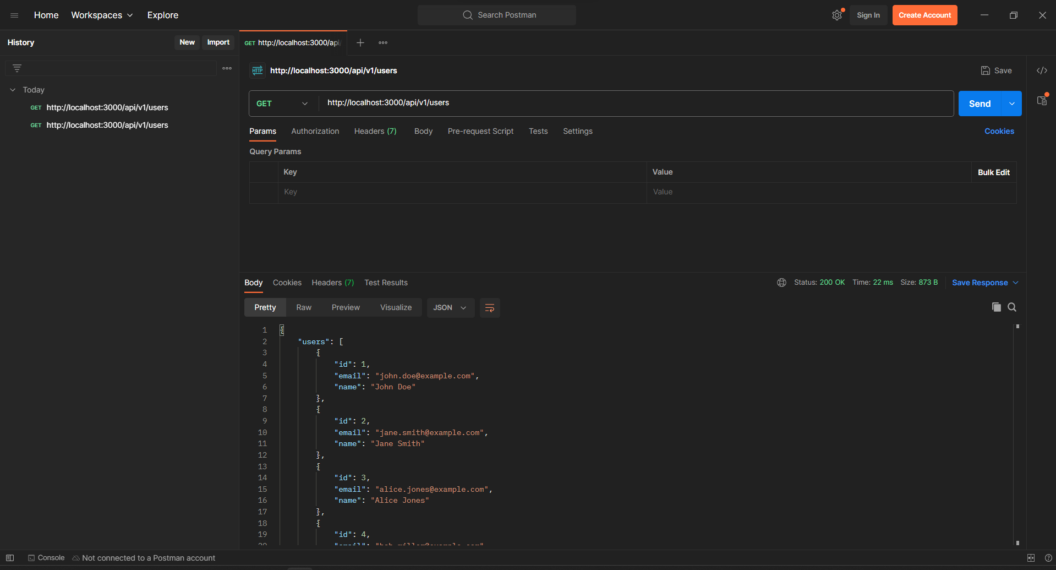
Wow! This time, the server returns a response in 22 ms! Not surprisingly, that is exactly the difference between the 272 ms required by the API the first time and the 250 ms forced wait in the code.
哇!这次,服务器在 22 毫秒内返回响应!毫不奇怪,这正是 API 第一次所需的 272 毫秒与代码中的 250 毫秒强制等待之间的差异。
Et voilà! Your Redis-based caching layer in Node.js works like a charm!
瞧! Node.js 中基于 Redis 的缓存层非常有用!
Extra: Compress Data Before Storing It in Redis
额外:在将数据存储到 Redis 之前压缩数据
The approach to implementing the caching layer in Node.js presented above is great, but it has one major drawback. JSON is not the most byte-efficient data format. Storing raw data directly in Redis is good for readability, but it comes at the cost of memory usage.
上面介绍的在 Node.js 中实现缓存层的方法很棒,但它有一个主要缺点。 JSON 不是字节效率最高的数据格式。将原始数据直接存储在 Redis 中对于可读性有好处,但这是以内存使用为代价的。
To avoid that, you can compress the raw response produced by the server before writing it to Redis and then decompress it after reading it accordingly. All you have to do is add a compression option to your writeData() and readData() functions and use the Node.js built zlib library as below:
为了避免这种情况,您可以在将服务器生成的原始响应写入 Redis 之前对其进行压缩,然后在相应地读取后对其进行解压缩。您所要做的就是向 writeData() 和 readData() 函数添加压缩选项,并使用 Node.js 构建的 zlib 库,如下所示:
async function writeData(key, data, options, compress) {
  if (isRedisWorking()) {
    let dataToCache = data;
    if (compress) {
      // compress the value with ZLIB to save RAM
      dataToCache = zlib.deflateSync(data).toString("base64");
    }
try {
await redisClient.set(key, dataToCache, options);
} catch (e) {
console.error(`Failed to cache data for key=${key}`, e);
}
}
}async function readData(key, compressed) {
let cachedValue = undefined;
if (isRedisWorking()) {
cachedValue = await redisClient.get(key);
if (cachedValue) {
if (compressed) {
// decompress the cached value with ZLIB
return zlib.inflateSync(Buffer.from(cachedValue, "base64")).toString();
} else {
return cachedValue;
}
}
} return cachedValue;
}
Then, add an optional compression argument to the redisCachingMiddleware() function all well, and pass its value to writeData() and readData():
然后,向 redisCachingMiddleware() 函数添加一个可选的 compression 参数,并将其值传递给 writeData() 和 readData() :
function redisCachingMiddleware(
  options = {
    EX: 21600, // 6h
  },
  compression = true // enable compression and decompression by default
) {
  return async (req, res, next) => {
    if (isRedisWorking()) {
      const key = requestToKey(req);
      // note the compression option
      const cachedValue = await readData(key, compression);
      if (cachedValue) {
        try {
          return res.json(JSON.parse(cachedValue));
        } catch {
          return res.send(cachedValue);
        }
      } else {
        const oldSend = res.send;
        res.send = function (data) {
          res.send = oldSend;
if (res.statusCode.toString().startsWith("2")) {
// note the compression option
writeData(key, data, options, compression).then();
} return res.send(data);
}; next();
}
} else {
next();
}
};
}
This time, the Redis client will show some compressed data:
这次,Redis 客户端将显示一些压缩数据:

Note that the size of the stored value decreased from 636 bytes to 348 bytes. That is a 45% memory savings! On larger responses, the size gain will be even more noticeable.
请注意,存储值的大小从 636 字节减少到 348 字节。这节省了 45% 的内存!对于较大的响应,尺寸增益将更加明显。
Thus, although data compressions and decompressions add a small server CPU overhead and response time, this new approach leads to much better memory utilization. Considering how expensive RAM is, that is a huge achievement that can save your architecture a lot of money!
因此,尽管数据压缩和解压缩会增加少量服务器 CPU 开销和响应时间,但这种新方法会带来更好的内存利用率。考虑到 RAM 的昂贵程度,这是一项巨大的成就,可以为您的架构节省大量资金!
To explore the entire code of the Node.js Redis caching layer with compression, move to the compression branch in the tutorial’s repository:
要探索具有压缩功能的 Node.js Redis 缓存层的完整代码,请移至教程存储库中的 compression 分支:
git checkout compressionConclusion 结论
In this article, you learned what a Node.js caching layer is, why Redis is the ideal cache provider to build it, and how to implement it. A caching layer is a set of files in a Express application that contain all the Redis caching logic. This allows you to keep your codebase tidy and organized while providing huge performance benefits. Adding such a layer to your backend is easy, and here you saw how to do it in this Redis Node.js guided tutorial.
在本文中,您了解了 Node.js 缓存层是什么、为什么 Redis 是构建它的理想缓存提供程序以及如何实现它。缓存层是 Express 应用程序中的一组文件,其中包含所有 Redis 缓存逻辑。这使您可以保持代码库整洁有序,同时提供巨大的性能优势。将这样的层添加到后端很容易,您在 Redis Node.js 指导教程中了解了如何执行此操作。
Originally published at https://semaphoreci.com on February 13, 2024.
最初于 2024 年 2 月 13 日发布于 https://semaphoreci.com。